
[fusion_builder_container hundred_percent=”no” equal_height_columns=”no” menu_anchor=”” hide_on_mobile=”small-visibility,medium-visibility,large-visibility” class=”” id=”” background_color=”” background_image=”” background_position=”center center” background_repeat=”no-repeat” fade=”no” background_parallax=”none” parallax_speed=”0.3″ video_mp4=”” video_webm=”” video_ogv=”” video_url=”” video_aspect_ratio=”16:9″ video_loop=”yes” video_mute=”yes” overlay_color=”” video_preview_image=”” border_size=”” border_color=”” border_style=”solid” padding_top=”” padding_bottom=”” padding_left=”” padding_right=””][fusion_builder_row][fusion_builder_column type=”1_1″ layout=”1_1″ background_position=”left top” background_color=”” border_size=”” border_color=”” border_style=”solid” border_position=”all” spacing=”yes” background_image=”” background_repeat=”no-repeat” padding_top=”” padding_right=”” padding_bottom=”” padding_left=”” margin_top=”0px” margin_bottom=”0px” class=”” id=”” animation_type=”” animation_speed=”0.3″ animation_direction=”left” hide_on_mobile=”small-visibility,medium-visibility,large-visibility” center_content=”no” last=”no” min_height=”” hover_type=”none” link=””][fusion_text]
The Conditional Thank You Pages Add-On allows you to segment leads to different personalized thank you pages based on criteria they submit in the form.
[/fusion_text][fusion_alert type=”notice” accent_color=”#808080″ background_color=”#ffffff” border_size=”” icon=”” box_shadow=”” hide_on_mobile=”small-visibility,medium-visibility,large-visibility” class=”” id=”” animation_type=”” animation_direction=”left” animation_speed=”0.3″ animation_offset=””]
This tutorial requires the Conditional Thank You Pages Add-On!
[/fusion_alert][fusion_text]
It’s a fairly easy process to setup up! Once you install and activate this add-on, all you have to do configure the new settings widget in your forms to activate it.
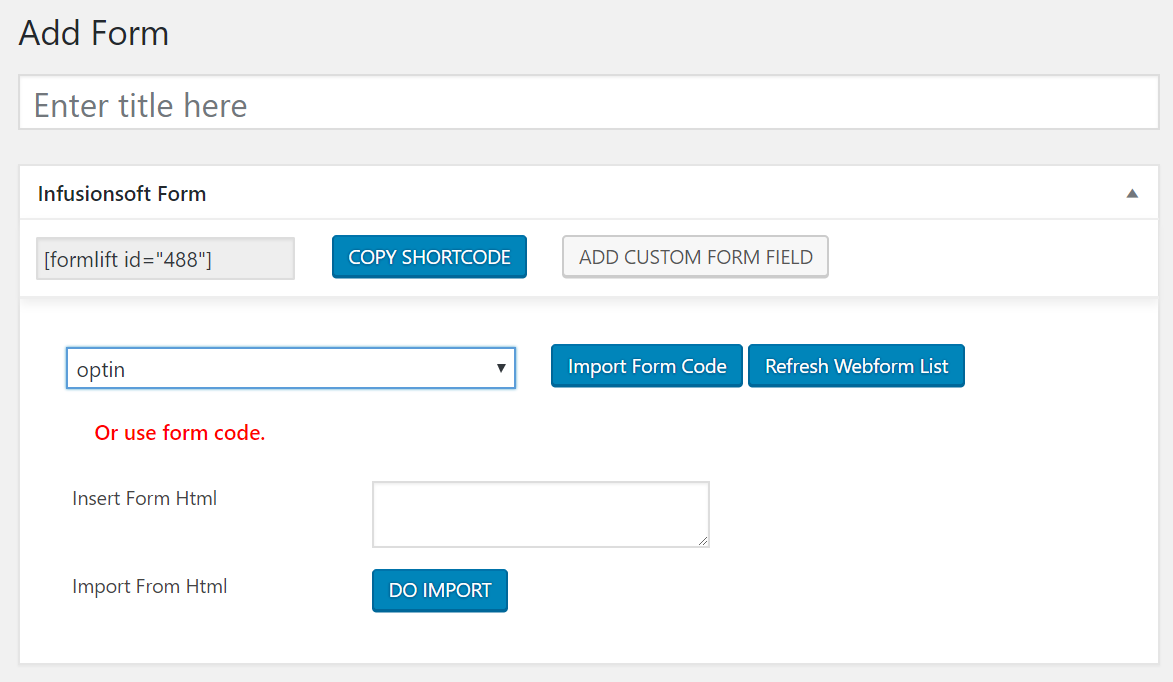
1. Import your form:
Go to Add form, select your form from the drop down, and click Import. Alternatively you may past in form code and import that way.
[/fusion_text][fusion_text]
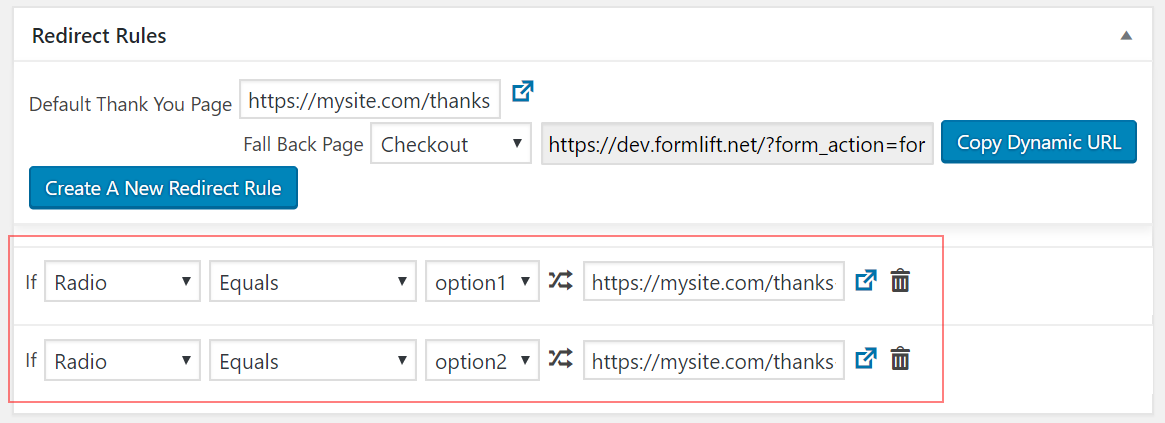
2. Set your criteria:
A new widget has been added to your form editor screen! Use it to set the criteria.
To select which field you want to make the condition based on, just choose the field in your form from the drop down.
Then set the IF condition, followed by the URL you wish to redirect to.
[/fusion_text][fusion_text]
3. Set your default thank you page:
In case there’s a way that none of your conditions are met, it’s best to define a default page to send leads to.

[/fusion_text][fusion_text]
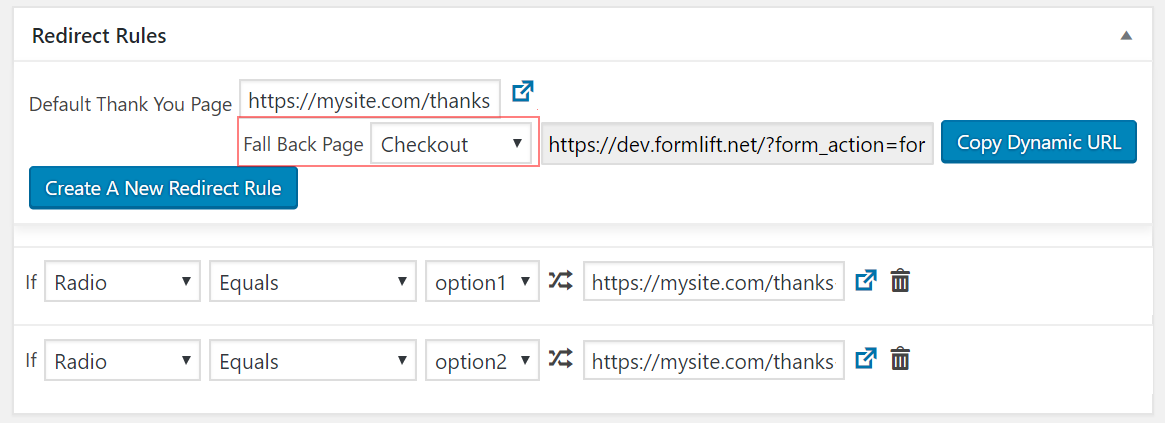
4. Set your fall back page:
In case the redirect breaks, doesn’t work, or for some other reason there is a conflict you can set a “fall back page” which will “drop Off” leads there. Select any page on your site.
[/fusion_text][fusion_text]
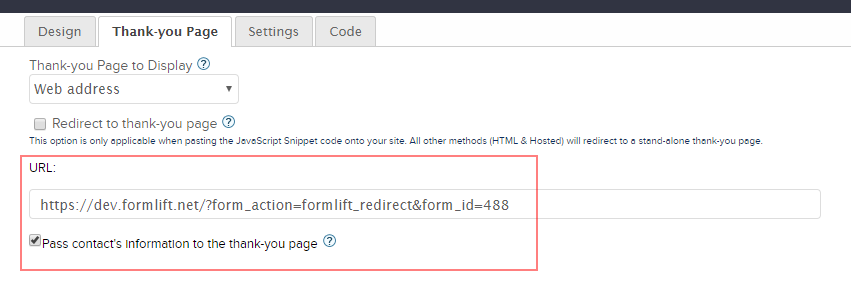
4. Set the thank you page in Infusionsoft:
The form will NOT use these settings by default, you actually have to tell INFUSIONSOFT to use these settings. But we’ve made that easy!
First, copy the “Dynamic URL” by clicking the button below.
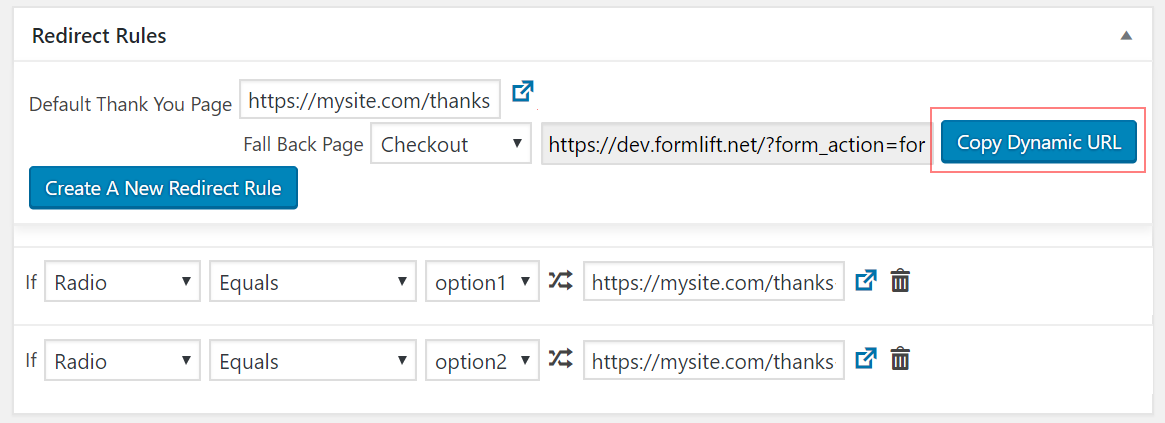
Then, you must go to your form in Infusionsoft and paste that URL in the thank you page. MAKE SURE to tick the “send contact info to thank you page” button or it WILL NOT WORK!
[/fusion_text][fusion_text]
THAT’S IT!
[/fusion_text][/fusion_builder_column][/fusion_builder_row][/fusion_builder_container]